Wednesday, November 27, 2013

Creating live sessions in Reason

Creating live sessions in Reason is very easy. You just stack up devices which have the RUN option and assign each to separate controller of your MIDI Surface

Even better approach would be to organize your segments into combinator patches and use the Run Pattern Devices button on each - that way it would be much easier to orientate yourself into the session`s setup, if you haven`t opened the file for a long time. You can also use one physical knob to control multiple effects.

Assigning midi controllers to the devices in Reason is easy – just right click on the desired virtual rotary / button… etc. and select Edit Remote Override Mapping… 


Then put a tick on Learn From Control Surface and just twist the physical knob / press the physical button… etc. that you wish to use for controlling it. If the  Input Control Surface Activity meter displays any activity, that means your selection has been recognized and the only thing left to do is to press OK

You can create folder for the live session which will contain all of the session`s segments (combi patches). It can be updated with new patches easily at any time. You just load one patch from it into the combinator, and then change it by selecting the previous or next option of it`s file browser. That way you can make extremely long sessions without tiring your CPU. You can also make separate folder for interchanging beats or effect patches (beat repeaters, global ECF, etc...).


Example combi patch setup.

You can set the controls for toggling the previous and the next combinator highlighted and for the previous and the next patch selection of the highlighted one to be made with specific buttons of your MIDI Surface as well - just go to Options -> Additional Remote Overrides...


When you play live sessions that way, you will need at least two combinator devices pointed at the same folder. While one plays, the other one loads the next patch. If you play the combi patches in order with the next option of the browser, you will notice that you are always having to hit next twice, which will double the loading time. It would be better to setup your segments in a way in which one combinator uses only previous, while the other uses only next, starting from the middle of the combi list and moving away from each other.


You can control the rotaries / CV inputs  of multiple combinators with a single one through CV. This can be done by routing the Thor Modifier`s CV signals to CV splitter and then to the combinator` CV inputs.


That`s basically it. Now you can setup your own unique live session template.


Friday, November 22, 2013

#15. The Combinator in Reason


The Combinator is one of the coolest devices in Reason. It allows you to create complex instruments or effects patches, constructed from multiple rack devices. The combinator can also help you to better organize your rack.


On the top we see that the device has on / off / bypass switch like a typical effect unit. On the right of it is the patch browser, featuring two volume meters for the internal and external sound levels. It has the usual pitch and mod wheels on the left.

The combinator has four assignable knobs and the same number of buttons in the middle. On the left we see buttons for running the devices inside (those having RUN option - Redrum, Rex, Matrix enabled) and a button which automatically bypasses all effect units present in the combinator.

*Note that there is no difference between the usual Combinator device and the MClass Masterin Suite Combi one with the letter M on the right - it is just cosmetic change. You can change the backdrop of a combinator by rightclicking on it and selecting Select Backdrop...

There are two more buttons below.


Also selectable from the back:


Show Devices opens the Combinator (It is empty by default). In order to insert a device, Right Click inside the area opened and select Create - > Then insert whatever instrument / effect you want to create.


All the instruments you insert into the combinator will be played simultaneously when you input midi data into it (play it with midi keyboard, draw pattern in sequencer).

A little word about routing...

There are two sets of input and output audio pairs on the back - External Routing Area and Connect to Devices in Combi (seen only when Show Devices is active). 


You can theoretically run all the devices in a combinator without using the inputs and outputs at all - just route them to external mixer and you`ll be fine. This however, will be inefficient when it comes to saving the patch - this would mean that you`ll have to manually connect the devices each time you load a patch. It is much better to create mixer INTO the combinator and keep the connections saved in the patch. The outputs of the mixer go into the From Devices input, and then gets routed to the next destination trough the Combi Output pair. 


When the combinator patch is used as an effects unit, containing effects only, you route the instrument you want to affect with it to the Combi Input. Then you route To Devices outputs to the first effect of the effects` chain inside the combinator. The last effect in the chain is routed to From Devices input and from there it reaches the next destination trough the Combi Output.


When used as an effect processor, the combinator`s upper in and out connections can be seen as being the same as those of the effects in Reason, such as the Scream 4 for example.


Example effect - the To Devices output is connected to the first effect of the chain inside the combi. The last effect goes into From Devices input. Now you can connect an instrument trough the Combi Input and then route the processed sound to the desired destination trough Combi Output.

Let`s click Show Programmer...


This is what we get:


On the left side we see the complete list of the devices present in the combinator, ordered in the same way. The instruments have key range selector on their right side, similar to the one in the NN-XT Sampler. By default, it covers the whole range, but it can be moved and resized. This can also get done by the use of the Key Range Lo / Hi fields below. We can also select a velocity range, outside of which the sound doesn`t get played. We can transpose notes of the device, or disable it`s receiving of notes if we don`t want it to output any sound.

Below we can select which Performance Controllers we can enable.

The Modulation Routing is pretty easy to understand. 


We select the source of modulation from the left column:


The four rotaries and buttons refer to those in front of the combinator device. The Target area selects which controls of a device are going to get modulated. The Min and Max values determine the range of the effect.

We can have up to ten modulation settings on a device. 


On the back of the device we have the usual gate and note CV inputs.


We also have CV inputs for external controlling of the wheels and the rotaries in front of the device. The CV options below are the inputs for the CV controllers in the Source column of the Modulation Routing.


And... we`ve covered it all I guess...

#14. CV Devices - The Matrix Pattern Sequencer


The Matrix Pattern Sequencer is a device outputting modifiable CV signals.


There are three CV outputs in the back: Curve CV – with an option of switching between unipolar and bipolar curve, Note CV and Gate CV.


The Note CV output behavior is controlled by the note patterns drawn in the sequencer area.


It has an octave selection switch.


The Gate CV  output is controlled by the amount modifiers below each note. They can be tied with the TIE button switched on, or by holding SHIFT (Whether the TIE button is switched on or off, the holding SHIFT will do the opposite).

To be able to modify the Curve CV, you have to switch from Keys to Curve display. It will display either unipolar or bipolar curve, determined by the switch in the back of the device.

When placed after a synthesizer or sampler (without holding SHIFT), the Matrix automatically connects the Note CV and Gate CV outputs to the corresponding inputs of the device. When started with the RUN button (starts also automatically after you press Play) the matrix starts using the device to play its sequence - Note CV signals control the notes played, while the Gate CV signals control the loudness the corresponding note.

This device can also maintain up to 32 different patterns which are selectable from the area on the left. If you want to switch off the device, disable the Pattern button above. To copy the pattern to the main`s sequencer note lane, rightclick on the pattern and select Copy Pattern to Track.


Alternatively, you can rightclick on the pattern area and select Edit Automation. This will create lane for the matrix in the main sequencer for pattern drawing (in that case, Pattern should remain enabled). 


You can select the number of steps of the loop, ranging from 1 to 32 and the speed, controlled by the Resolution knob. The Shuffle button introduces a little bit of swing to the sequence, giving it somewhat human feel.

 This concludes the Matrix Pattern Sequencer guide.


Monday, November 18, 2013

#13. Sampling in Reason - Percussion

Reason has some pretty powerful devices when it comes to beat making.

Let`s start with the Redrum Drum Computer...


This device has 10 sample slots and up to 64 steps step sequencer. 

All the channels have basically the same options with some small exceptions. You have mute, solo and trigger buttons on the top. Below them is the browser which selects a sample for that specific slot. The global patch loading browser is located on the bottom left of the device. 


Each channel has options which we`ve already covered - panning (with stereo indicator), level (the global level is in the top left corner of the device), sample length selection, fast-slow release switch and pitch. The velocity control options can affect the volume and the start of the sample.

If you want to draw pattern in the sequencer for a channel, use the SELECT button to highlight it for editing (more about the sequencer in a sec).

The S1 and S2 knobs are the two send effect rotaries. They have outputs on the back, numbered accordingly. You can link those to some effect devices` inputs and route them to the mixer. Then, you can feed that processed signal to the original with an amount determined by the knobs. 


They can be viewed as an alternative audio outputs which can be processed differently.

Some channels have different options on the bottom. They use alternative coloring.


Pitch  rotary + Pitch controlled by velocity rotary. It also has pitch bend tweaking rotaries. 


 Tone + Tone determined by velocity control knobs.

On the bottom left of the device, you have CHANNEL 8-9 EXCLUSIVE button, which prohibits those to play simultaneously. Channel 9 will cut channel 8.


Finally, we`ve got the pattern section.


Like the ReGroove Mixer, it has a PATTERN selection, where you have 32 patterns, divided into 4 banks. You start with 16 white blank squares, on which you can draw the pattern desired. By default, it is set to 16 steps. To make it longer, change the number above STEPS. Then use the EDIT STEPS switch to setup the additional steps on the sequencer. DYNAMIC determines the type of velocity by which the sample plays - it is medium by default, but it can be mild or severe. The FLAM option plays small copy of the signal right before it. In order to be able to hear the effect, the knob on the left of should be turned to the right.


The pattern blocks are colored differently, depending on the velocity settings, set by the DYNAMIC option. The one having FLAM effect applied has small red pointer above it.

You can edit the resolution of the track with the RESOLUTION knob. You can add some shuffle with the SHUFFLE button.

If enabled, the RUN button starts the Redrum`s sequencer independent of the Reason`s global one. In order to use the latter, click on the ENABLE PATTERN SELECTION to turn off the built in the Redrum one (in order for them not to conflict with each other), then right click on the Redrum and select Copy Pattern to Track

T

This will move the patterns created to a lane on the Reason`s sequencer. 

If you draw a pattern in the sequencer, instead of note lane, then leave ENABLE PATTERN SELECTION active. The RUN button will automatically start playing whenever pattern area of the sequencer has been reached.

On the back of the device, each channel has gate in and pitch input and gate out output.


You can trigger multiple samples with one hit, without having to draw the same pattern for each of them in the sequencer - just insert the CV Out of the sample which has pattern already drawn to the inputs of those who you wish to get also hit along with it. 

***

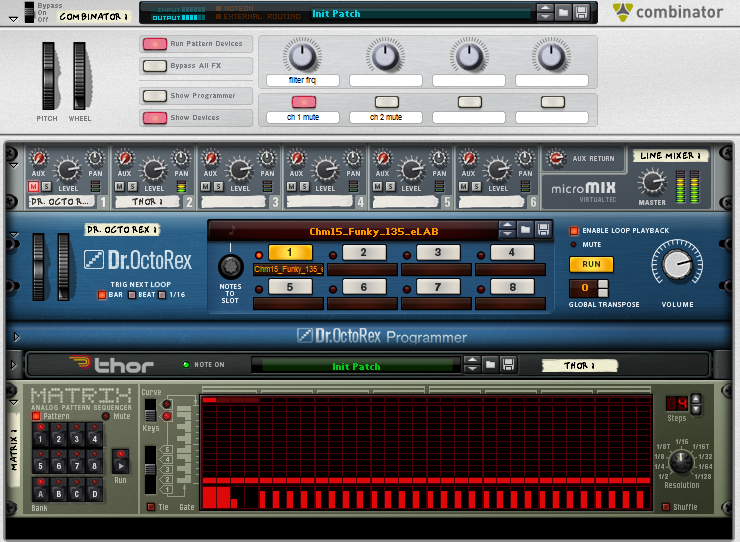
Dr. Octo Rex is loop playing machine - something like a Redrum with already created pattern. It runs on .rex / .rex2 files, created up to Reason 7 by external program, named ReCycle. It is a beat divided into tweakable slices.

 This is the updated version of dr. Rex (last seen in R4).


The main difference is that rather then just one loop, you can load eight and tweak them live. 

As you can see, there are some of the usual controls present like the pitch bend / mod wheels, global pitch transpose. The VOLUME knob is on the right. We are going to focus only on the features which are unique to that device .

The device has also got RUN function, like Redrum. Similarly, when you want to export the loop to the sequencer, you right click (on the expanded area) and select Copy Loop to Track (there is also a button allowing you to do that, see below). You can also use the note lane or pattern mode in the sequencer. In that case, leave the loop playback enabled.

To load a rex loop, use either the global browser on the top, which can load patches containing multiple loops and settings applied to them, or select loops individually, by clicking below the number of each slot. Open browser... option appears: 


You can do the same using another browser, seen on a picture below later.

After you load a loop, use RUN to start it. If you load multiple samples, you can switch them live while playing by clicking on their number.

The area on the left contains three TRIG NEXT LOOP options. They determine the live changing of the loop`s behavior. With the mode set to BAR, when you play a loop and then switch to another one, the first will be played to it`s bar endpoint before switching to the next. The next two options cut through the first loop without waiting for the bar to finish - the last has the fastest attack.


When you copy loop to a track of the sequencer, you see an additional tweakable option below - Notes to Slot.


It is basically an automation of loop selection. The loop played will change according to the pattern drawn, based on the slice sequence drawn above it.


Rather then the numbered buttons as in RUN mode, the thing that lights up is a small indicator on the left of each pattern slot.
It can be moved by the NOTES TO SLOT knob.

To expand the device, click on the bottom left pointer.


You see that the right side of the device consists of already covered stuff, so we are going to focus on what`s going on in the left side only:


In that area we can edit the settings of each individual loop.  If you want the display to change automatically, according to the sample triggered by the main 8 buttons on the top of the device (not seen in the picture) enable FOLLOW LOOP PLAYBACK

You can make selection of individual slices with you midi surface by enabling SELECT SLICE BY MIDI.

We have another browser area, from which we can load individual .rex loops. We have COPY LOOP TO TRACK button, pitch transposition and volume controls for each individual loop. 

You can transpose the loop by selecting different keys on the piano graphic on the top right of the sample editing area.


There are eight knobs below the display. The first highlights the sample we`d like to edit. The ones that follow are self explainatory. The ALT function basically groups the selected slices (in up to 4 groups) in an alternation group. Whenever a grouped sample gets triggered, we hear either it or some of it`s group colleagues on a random basis. The OUTPUT knob determines to which output is the sample going to get routed. There are 4 additional pairs of audio outputs on the back.


When you enable the SLICE EDIT MODE button, the display of that area changes:


It`s a alternative way of making the same tweaks using bipolar curve. You click on the desired effect`s name and tweak it for the desired slice.

The CV options on the back are pretty straight forward. The VOICE 1 FILTER ENV output uses the filter envelope to manipulate the pitch of the targeted device. This option is also available on NN19.  


This is it - now you can start tweaking your own crazy beats.

Wednesday, November 13, 2013

#12. Effects in Reason - The Scream 4 Distortion Unit


Scream 4 is the distortion effect in Reason. It is divided into three sections - Damage, Cut and BodyEach section can be enabled or disabled by the small button on the left of it`s name.


The DAMAGE section has DAMAGE CONTROL knob, controlling the amount of the effect applied, while the knob on the right of it selects the type of the effect. Each effect has two customizable options, controlled by the two knobs below. 


OVERDRIVE - Dynamic analog overdrive effect with TONE and PRESENCE (mid to high frq boosts) adjustment.

DISTORTION -  Similar to the one above, but thicker.

FUZZ - Piercing distortion effect.

TUBE - Old valve guitar amplifier emulator.

TAPE - An algorithm, emulating tape saturation clipping. The SPEED of the tape controls the brightness of the sound, while COMPRESSION controls the compression applied.

FEEDBACK - As the name implies - feedback type of distortion.

MODULATE - Ring modulation effect. The signal is multiplied by compressed and distorted copy of it.

WARP - Distorts and multiplies the incoming signal with itself.

DIGITAL - Bit resolution and sample rate reducer. You can make Nintendo-ish sounds using that.

SCREAM - High gain and high resonance band pass filter effect, followed by fuzz type of distortion.

The CUT area in the middle is a three band EQ, with low frequency, mid frequency and high frequency control sliders. 


Visual representation of the frequency range of each slider. We analyze the spectrum of a white noise signal by running it trough vocoder:


Boosting the low frequency slider to full (with 2 identical scream 4 units used, in order to show the effect more prominently):


Boosting the mid frequency slider to full:


Boosting the high frequency slider to full:


The BODY section emulates speaker cabinet effects upon the sound.


The RESO controls the resonance amount.

SCALE sets the volume of the virtual cabinet while altering the resonance. 

AUTO changes the scale parameter, based on the incoming sound.

The TYPE knob gives you the ability to select between 5 different types of cabinets.

The MASTER knob sets the volume of the already processed sound.

The effect has CV inputs on the back for controlling the Damage, P1, P2 and Scale with amount knobs next to each. It also has an Auto CV Output option.


***

The D-11 Foldback Distortion unit is an older distortion effect in Reason. 

It has standard AMOUNT knob and a FOLDBACK knob with a small visuals of the distortion fold back effect upon the sound.


 It has an Amount CV input on the back:


This concludes the Reason`s basic distortion effects guide.