Have you ever seen one those Moog modular monsters? One may ask himself: "What kind of crazy evil minded genius you have to be to know how this monstrosity works?". Well, the complexity is just an illusion - the whole system is composed of many, often repeated simple things. And the Propellerhead Reason wiring is no different.
Open a new, empty rack. Now the only thing you see is the Hardware Interface device on the top. This device is always presented and is basically the final destination of the audio signal. This is the device connected to your midi and audio hardware also you can use it as a connector to other programs (Like Fruity Loops Studio, Ableton Live, etc...) via ReWire.
The hardware interface has both Midi In and Audio Out devices (more about midi in and rewire - later...). For now, we are interested only in the Audio Out section. It transfers the audio signal to your sound card or rewires Reason to other programs.
Most probably, you are going to have only the first two audio output channels (one for the left and one for the right speaker) present, but you may have more depending on your sound card.

The available channels are colored yellow, when you make the connection, they become green.
Now right click on the black area below and create Thor Polysonic Synthesizer (you can also create it from Create on the upper menu, or from the tool window accessed with F10).
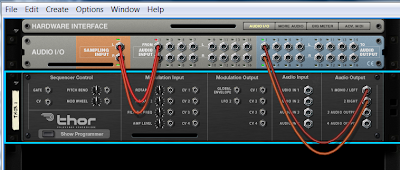
Hit TAB to look at the back of the rack. You can see that the output cables of Thor have been automatically connected to the input of the hardware interface:

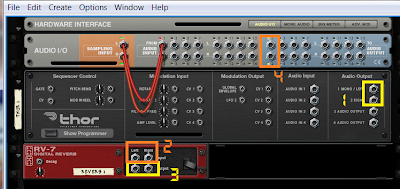
Now you can play the synthesizer with your keyboard or you can write notes in the sequencer (which is either below the devices and needs to be dragged up, or is using another window, if you have hit Detach Sequencer Window from the Window of the menu above). You might have noticed that the wiring has been made automatically (Reason always auto connects the newly created device to the nearest one), but you are often going to need to do the connection manually. Let`s try that. Right click and while holding shift create RV-7 Digital Reverb. OK, now look at the back of the devices again... You will see that because of the holding shift action the effect has not been connected automatically to the synthesizer. Our goal is to put some reverb effect on Thor - drag the cables from the Thor`s left and right outs and put them in the reverb`s left and right ins accordingly, then put the reverbs left and right outs back to the hardware interface`s ins. It is simple as that, now the effect is affecting the synthesizer successfully:

1 - The Thor`s outputs; 2 - The Reverb`s inputs; 3 - The Reverb`s outputs; 4 - The hardware interface`s inputs.
When finishing the connection, this is the result you should get.
Let`s do another interesting thing. Begin with a new, empty rack (from File -> New). Hold SHIFT and create tree new devices - a Thor Polysonic Synthesizer, a RV-7 Digital Reverb. and a DDL-1 Digital Delay Line. Now put the left out of the Thor in the left in of the reverb. It will automatically connect both left and right cables, but you need to remove the right one.
Then connect the left out of the reverb to the left in of the hardware interface. It will also connect both cables and you need to remove the right one again. As you may have guessed, we are going to create different effects for the left and the right outputs of Thor. Take the right out of thor and put it in the left input of the delay (you might intuitively put it in the right input, but it should be the left one), then connect the left out of the delay to the right input of the hardware interface. What you are going to get in result is reverb in the left speaker and delay in the right speaker.

This is the final result you should get. Notice how even if we output the right cable of Thor, we still need to put it in the left input of the delay. Then we connect the left out of the delay to the right in of the hardware interface. Single cables are connecting always to the left channel of a device.
This is the basic audio wiring tutorial. You can connect all kinds of devices to different effects, than connect them into more effects, connect also only the right or lefts outs in different ones in an endless progression. All the devices have their inputs and outputs in similar places (if you can`t exactly see where they are in a particular device, create it without holding shift to see how it auto connects). Spend a little time experimenting with those concepts, be sure that you understand everything presented here well before moving to the next tutorial.


0 Kommentarer:
Post a Comment