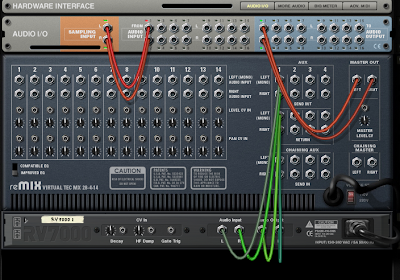
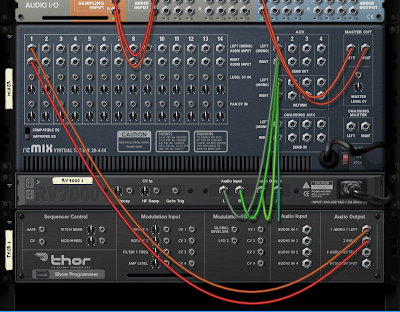
In tutorial #1 Basic Audio Wiring we learned how to connect a device to the hardware interface. If you have a standard sound card like me, you may have already noticed that there is only one available pair of inputs for left and right signals, which can support only one device... So the question is - how can we link more devices to the hardware interface? Well, we need to use a mixer.
Open new empty rack and create Mixer 14:2. Connect it`s outputs to the inputs of the hardware interface. Now you have 14 brand new input channels for 14 new devices.

With the mixer linked up, we now have 14 different inputs for 14 different devices.
Each time you create a musical instrument it will automatically connect to the next free channel of the mixer. If you need more channels, simply link the mixer to another one as shown in the picture below (it will auto connect):

All you need to do is to connect master out to chaining master cables. There are four cables that also auto connect and they are for the aux send effects. You will read more about them below. Connecting them is optional.
Let`s look at the front of the mixer. On the lowest row we see 15 volume sliders - 14 for each device and 1 in the end for the master level. Above that we have a panning knob, which moves the signal from left to right in the stereo field. Above it we have Mute and Solo buttons. Then, above that we have an EQ section which can reduce or boost low frequencies (bass, set at 80Hz) or high ones (treble, set at 12kHz ). On the back, in the down left angle of the mixer you can switch between two different types of that EQ.
At last, on the top of the mixer`s front there are 4 red auxiliary send effects knobs.

1. Volume slider, 2. Pan knob, 3. Mute / Solo buttons, 4. EQ button with Treble and Bass knobs, 5. Aux send knobs with pre-fader button.
When we added an effect to Thor in tutorial #1, it was an insert effect, affecting the signal directly. The signal was flowing from Thor trough the effect to the hardware interface.
The send effect works differently. It mixes the original dry (unaffected) audio signal with a copy of it with the applied effect. To make an auxiliary send effect, just create an effect below the mixer (but not below another device) and it will link automatically. It`s outs will go into send out section and it`s ins will go into the aux section.

Linking an instance of RV7000 Advanced Reverb to the first aux send channel. We can now control the effect with the first of the four red knobs on the upper front of the mixer.

Make sound device, for example Thor and put it in the first channel of the mixer.

On the mixer`s front side bring the first aux send knob up a bit. Now when you play the sound of Thor you gonna hear the effect next to it.
We can have up to 4 send effects in a single instance of mixer 14:2 and use them on any of the devices linked to it. We control their amount with the red knobs on the top of the mixer. The small button, left from the lowest red knob switches the Pre Fader On/Off, basically leave it as it is on off and the ratio between the original signal and the affected one will stay the same when you make changes of the sound`s volume.
The red knobs on the top right of the mixer determine the return level of the effect.
We can use those effects in a technique that The Prodigy uses for example when creating beats called Parallel Compression, where you mix your beat signal with an overcompressed version of it (more about the compressor - later). We can also connect a chain of effects in the aux not just one.
When you create new mixer, the four chaining aux cables of the old one connect to the four aux channels of the new one. That way, the effects of the old mixer can be used in the new one too. If you wish to put new effects into the new mixer instead, do not connect those cables (but leave chaining master to master out connection as it is).
On the back of the mixer, below the input channels you can see smaller inputs...

We will talk about them later, they are basically control voltage inputs which can use external signals to control the level and the panning of a particular channel. The little knobs determine the amount of the effect.

We will talk about them later, they are basically control voltage inputs which can use external signals to control the level and the panning of a particular channel. The little knobs determine the amount of the effect.
There is also another, simpler mixer called Line Mixer 6:2. It has only one aux send and lacks the level control voltage input on the back - it has only one for panning. The aux pre fader on/off option is on the back of the device.

That`s basically all you need to know about the mixer. Make sure you understand the logic behind the connections then move to the next lesson.


0 Kommentarer:
Post a Comment